In my last several years of personal training, I have devoted a great deal of time to the analyses of various aikido techniques to improve my skills. I have studied the technical approaches of several of the better known historical and contemporary figures to understand their mechanics and execution of techniques.
Recently, I have also published a number of my own technical and a course called the “Zone Theory of Aikido” explaining my findings and offering them for peer review. Many people have been encouraging in their reactions to my observations and proposals. There have of course been a number of individuals who have been critical in their appraisal of my methods and viewpoints.
It occurs to me that some aikidoka might find my approach to analyzing and fine-tuning techniques of interest. The process I rely on tends to follow a certain sequence that I have now repeated many times in search of effective techniques which do not depend on physical strength. Let me describe the process.
As Morihiro Saito was my direct instructor for many years, I review his basic form as my starting point. However, I also consult Morihei Ueshiba’s 1938 book “Budo”, the surviving films and photos of the Founder, both pre- and postwar, for hints. I sometimes refer to videos of contemporary teachers as well. I tend to look for techniques where I see a sticking point or obvious openings, especially if my students find certain techniques difficult to execute.
When I take naps, I often find that my mind naturally visualizes movements which I then mentally rehearse. Next, I will pantomime the technique on my own to accustom my body to a new flow of movement.
The final step will be to bring the new method into the dojo and try it out on each of my students. Sometimes I will encounter a glitch here and there that I work to smooth out. This will usually involve modifying my positioning to off balance uke and being sure to stay relaxed.
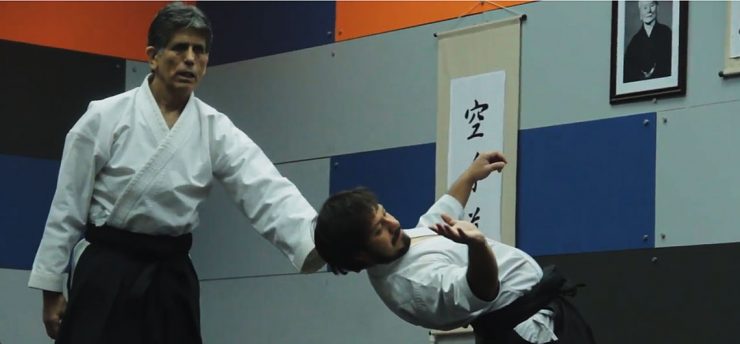
To give an example I have discussed on several occasions, let’s consider katatetori ikkyo. The problem I ran up against repeatly at the Iwama Dojo was that stronger members would grab nage’s wrist very tightly and use their knowledge of the technique being practiced to anticipate and block nage’s movements. This made training frustrating. I of course could block their execution of the technique the same way, but I found this to be counterproductive. Practitioners tended to settle on a practice method where both would only offer a certain amount of resistance short of stopping the technique. It was a sort of unspoken gentlemen’s agreement.
This was a very unsatisfactory situation to my way of thinking. It would not be until many years later that I discovered a way of executing katatedori ikkyo that worked on everyone consistently. I describe it in this video
 The gist of the problem in this case was that everyone was intending to “extend their Ki” when they were grabbed in katatedori. But what they were actually doing was tensing their arms! The tension in their arm provided feedback to uke who was then able to anticipate and stop nage’s movement at will.
In my case, the solution to this particular problem was two-fold: first, it involved lightly extending energy through the arm without tensing and moving from the center; the second part was a lateral movement into uke’s blind spot in order to set up the ikkyo. To this can be added an optional atemi to uke’s face and even a kiai, or combative shout.
I first settled on a cupped hand position — exactly like in tai no henko — and turned my hips away from uke. However, this deviated from the basic form Saito Sensei taught and I was thus not fully satisfied with this interim solution. I have since modified the movement further to look very much like Saito Sensei would teach in the dojo in Iwama. The main difference is a subtle relaxation of nage’s arm to eliminate feedback to uke. This change is barely noticeable, but it works reliably without nage tensing his arm when the ikkyo is executed from uke’s blind spot.
I will give one more example involving the iriminage throw that I research and modified. In surveying the various ways that iriminage is done in today’s aikido, it appears that the method developed by Kisshomaru Ueshiba, the Founder’s son, has won out as the most favored method largely based on being passed down to subsequent generations of Aikikai instructors. This is, of course, the circular version of iriminage where typically nage will enter behind uke and seize his collar while leading him around and down and then back up. From there, uke either falls backward or performs a high fall. Everyone has seen iriminage performed this way countless times in the All-Japan Aikido Demonstrations in Tokyo.
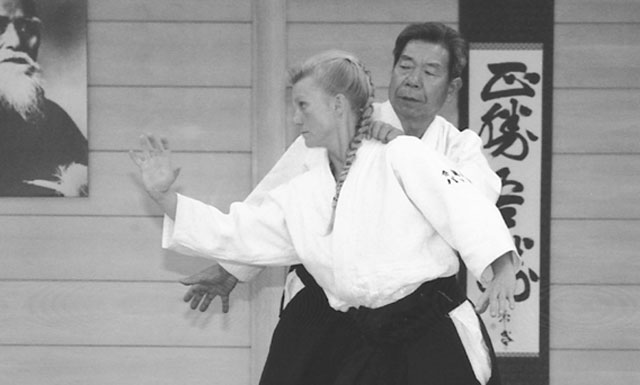
Saito Sensei would execute iriminage somewhat differently bringing uke’s head against his outside shoulder and then stepping in to throw while still controlling uke him in this manner. Personally, I felt uncomfortable doing it this way in Iwama. It was difficult for me to fully control uke’s head throughout the technique. And as uke, I noticed that most of the time I could easily counterattack nage’s outside leg. From then onward, I looked for a better way.
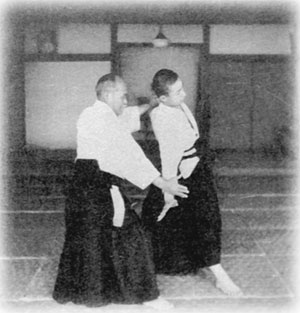 Lo and behold, I found the answer in Morihei Ueshiba’s 1938 training manual titled “Budo” on page 12. To take uke off balance, O-Sensei stands behind uke in a parallel stance and causes him to lose balance through the coordinated action of his hand on uke’s collar and the other arm leading uke out and down. This takes uke off balance backwards. It really is not possible to take a high fall when this iriminage is applied in this way unless nage purposely allows uke to turn inward and jump into the fall, for example, during a demonstration. “Budo” has been an invaluable source of documentation on the Founder’s prewar techniques. Some of the techniques of Morihei from this manual survived into the postwar period little changed.
Once again, to review the six steps I follow:
- Study Morihiro Saito’s basic form as the starting point
- Consult surviving documentation for hints on the way the Founder executed the technique
- Review different approaches of contemporary instructors
- Mentally rehearse through visualization
- Solo practice the form to imprint the new movement
- Take the technique into the dojo to test and modify to verify its effectiveness
A study of aikido techniques can be a lifetime endeavor. It has certainly been that for me. The amount of study material especially as represented by videos available on the Internet is practically unlimited. If practitioners can maintain a learner’s mind and always seek to improve their technique, constant discoveries will surely be the reward.
Reference sources
Morihiro Saito’s “Complete Guide to Aikido”
Stanley Pranin’s “Zone Theory of Aikido”


This is compatible with Mochizuki Minoru Sensei’s teachings. “Robuse” –as the technique was called initially, is the mother technique and the foundation of all other techniques. It’s the first technique taught to beginners and “it has to work!” This way beginners trust Aikido as a true martial art and are motivated to continue.
Thank you for sharing with us.
Patrick Augé
Dear Sensei,
You say that O Sensei’s right hand is ‘leading uke forward’ but it might appear that O Sensei’s right arm is heavy and drawing backwards, i.e towards O Sensei”s centre. It is hard to see that the purchase of O Sensei’s right arm on uke’s right arm has enough contact/traction to be able to ‘lead uke forward’.
I know you are right, of course, but I wonder if you might explain it briefly
Thank you for another instructive post, which I always keep for study.
With kind regards,
James
I have modified the wording to say “out and down”. From my own testing, I’m pretty sure what he’s doing is first leading the arm forward and then down. You must create a separation between you and uke otherwise uke will end up on the right side of your chest in the position you see in photo of Saito Sensei. By the way, look at Pat Hendrick’s balance and compare it to Kisshomaru Ueshiba in the old photo of O-Sensei. Very instructive. Thanks for your observation.